1 事务配置
关于Spring的事务,大家每天都会遇见或者用到,为了更好的理解Transaction的原理机制,我们从源码角度来解析,本文的调试源码基于Spring-3.2.x版本进行调试。
1.1 配置
配置XML文件annotationTransactionNamespaceHandlerTests.xml
<?xml version="1.0" encoding="UTF-8"?>
<beans xmlns="http://www.springframework.org/schema/beans"
	   xmlns:xsi="http://www.w3.org/2001/XMLSchema-instance"
	   xmlns:aop="http://www.springframework.org/schema/aop"
		 xmlns:context="http://www.springframework.org/schema/context"
	   xmlns:tx="http://www.springframework.org/schema/tx"
	   xsi:schemaLocation="http://www.springframework.org/schema/beans http://www.springframework.org/schema/beans/spring-beans-2.0.xsd
       http://www.springframework.org/schema/aop http://www.springframework.org/schema/aop/spring-aop-2.0.xsd
       http://www.springframework.org/schema/context http://www.springframework.org/schema/context/spring-context-2.5.xsd
       http://www.springframework.org/schema/tx http://www.springframework.org/schema/tx/spring-tx-2.0.xsd">

	<tx:annotation-driven/>

	<bean id="transactionManager" class="org.springframework.tests.transaction.CallCountingTransactionManager"/>

	<bean id="testBean"
		  class="org.springframework.transaction.annotation.AnnotationTransactionNamespaceHandlerTests$TransactionalTestBean"/>

	<context:mbean-export/>
TransactionalTestBean类
	@Service
	@ManagedResource("test:type=TestBean")
	public static class TransactionalTestBean {

		@Transactional(readOnly = true)
		public Collection<?> findAllFoos() {
			return null;
		}

		public void saveFoo() {
		}

		@Transactional("qualifiedTransactionManager")
		public void saveQualifiedFoo() {
		}

		@Transactional
		public void exceptional(Throwable t) throws Throwable {
			throw t;
		}

		@ManagedOperation
		public String doSomething() {
			return "done";
		}

		@Transactional
		protected void annotationsOnProtectedAreIgnored() {
		}
	}
上面XML配置主要是开启事务驱动,然后配置事务管理器和带有@Transaction注解的Bean对象
1.2 调试入口
public class AnnotationTransactionNamespaceHandlerTests extends TestCase {

	private ConfigurableApplicationContext context;

	@Override
	public void setUp() {
		this.context = new ClassPathXmlApplicationContext(
				"org/springframework/transaction/annotation/annotationTransactionNamespaceHandlerTests.xml");
	}

	@Override
	protected void tearDown() {
		this.context.close();
	}

	public void testIsProxy() throws Exception {
		TransactionalTestBean bean = getTestBean();
		assertTrue("testBean is not a proxy", AopUtils.isAopProxy(bean));
		assertEquals("Should not have any started transactions", 0, ptm.begun);
		bean.findAllFoos();
		assertEquals("Should have 1 started transaction", 1, ptm.begun);
	}
	}
通过调用testIsProxy方法调试事务流程
2 事务解析
2.1 事务NameSpaceHandler解析
2.1.1 加载事务驱动
在加载XML文件的时候,会通过XmlBeanDefinitionReader的loadBeanDefinitions方法来加载配置。
解析到改行的时候会调用BeanDefinitionParserDelegate的parseCustomElement方法来处理自定义命名空间处理器。
	public BeanDefinition parseCustomElement(Element ele, BeanDefinition containingBd) {
        // 获取 namespaceUri
        String namespaceUri = getNamespaceURI(ele);
        // 根据 namespaceUri 获取相应的 Handler
        NamespaceHandler handler = this.readerContext.getNamespaceHandlerResolver().resolve(namespaceUri);
		if (handler == null) {
			error("Unable to locate Spring NamespaceHandler for XML schema namespace [" + namespaceUri + "]", ele);
			return null;
		}
        // 调用自定义的 Handler 处理
        return handler.parse(ele, new ParserContext(this.readerContext, this, containingBd));
	}
通过spring.handlers的定义配置:
http://www.springframework.org/schema/tx=org.springframework.transaction.config.TxNamespaceHandler
找到对应的处理器TxNamespaceHandler,然后进行解析。关于Spring扩展机制NameHandler可以找文章了解
2.1.2 注册初始化处理器
初始化事务处理器init方法
public class TxNamespaceHandler extends NamespaceHandlerSupport {

	static final String TRANSACTION_MANAGER_ATTRIBUTE = "transaction-manager";

	static final String DEFAULT_TRANSACTION_MANAGER_BEAN_NAME = "transactionManager";


	static String getTransactionManagerName(Element element) {
		return (element.hasAttribute(TRANSACTION_MANAGER_ATTRIBUTE) ?
				element.getAttribute(TRANSACTION_MANAGER_ATTRIBUTE) : DEFAULT_TRANSACTION_MANAGER_BEAN_NAME);
	}


	public void init() {
		registerBeanDefinitionParser("advice", new TxAdviceBeanDefinitionParser());
		registerBeanDefinitionParser("annotation-driven", new AnnotationDrivenBeanDefinitionParser());
		registerBeanDefinitionParser("jta-transaction-manager", new JtaTransactionManagerBeanDefinitionParser());
	}

}
上面注册的三个解析器
TxAdviceBeanDefinitionParser : 用于处理tx:advice/标签全局定义的事务
AnnotationDrivenBeanDefinitionParser : 用于处理tx:annotation-driven/标签注解类型的事务
JtaTransactionManagerBeanDefinitionParser : 用于处理JTA事务
这里我们关注AnnotationDrivenBeanDefinitionParser的解析,调用parse方法
	public BeanDefinition parse(Element element, ParserContext parserContext) {
		String mode = element.getAttribute("mode");
		if ("aspectj".equals(mode)) {
			// mode="aspectj"
			registerTransactionAspect(element, parserContext);
		}
		else {
			// mode="proxy"
			AopAutoProxyConfigurer.configureAutoProxyCreator(element, parserContext);
		}
		return null;
	}
如果是proxy代理模式则会调用configureAutoProxyCreator方法:
	private static class AopAutoProxyConfigurer {

		public static void configureAutoProxyCreator(Element element, ParserContext parserContext) {
			AopNamespaceUtils.registerAutoProxyCreatorIfNecessary(parserContext, element);

			String txAdvisorBeanName = TransactionManagementConfigUtils.TRANSACTION_ADVISOR_BEAN_NAME;
			if (!parserContext.getRegistry().containsBeanDefinition(txAdvisorBeanName)) {
				Object eleSource = parserContext.extractSource(element);

				// Create the TransactionAttributeSource definition.
				// 创建注册TransactionAttributeSource的bean
				RootBeanDefinition sourceDef = new RootBeanDefinition(
						"org.springframework.transaction.annotation.AnnotationTransactionAttributeSource");
				sourceDef.setSource(eleSource);
				sourceDef.setRole(BeanDefinition.ROLE_INFRASTRUCTURE);
				String sourceName = parserContext.getReaderContext().registerWithGeneratedName(sourceDef);

				// Create the TransactionInterceptor definition.
                // 创建TransactionInterceptor的bean
				RootBeanDefinition interceptorDef = new RootBeanDefinition(TransactionInterceptor.class);
				interceptorDef.setSource(eleSource);
				interceptorDef.setRole(BeanDefinition.ROLE_INFRASTRUCTURE);
				registerTransactionManager(element, interceptorDef);
				interceptorDef.getPropertyValues().add("transactionAttributeSource", new RuntimeBeanReference(sourceName));
				String interceptorName = parserContext.getReaderContext().registerWithGeneratedName(interceptorDef);

				// Create the TransactionAttributeSourceAdvisor definition.
                // 创建BeanFactoryTransactionAttributeSourceAdvisor 的bean
				RootBeanDefinition advisorDef = new RootBeanDefinition(BeanFactoryTransactionAttributeSourceAdvisor.class);
				advisorDef.setSource(eleSource);
				advisorDef.setRole(BeanDefinition.ROLE_INFRASTRUCTURE);
				advisorDef.getPropertyValues().add("transactionAttributeSource", new RuntimeBeanReference(sourceName));
				advisorDef.getPropertyValues().add("adviceBeanName", interceptorName);
				if (element.hasAttribute("order")) {
					advisorDef.getPropertyValues().add("order", element.getAttribute("order"));
				}
				parserContext.getRegistry().registerBeanDefinition(txAdvisorBeanName, advisorDef);

				CompositeComponentDefinition compositeDef = new CompositeComponentDefinition(element.getTagName(), eleSource);
				compositeDef.addNestedComponent(new BeanComponentDefinition(sourceDef, sourceName));
				compositeDef.addNestedComponent(new BeanComponentDefinition(interceptorDef, interceptorName));
				compositeDef.addNestedComponent(new BeanComponentDefinition(advisorDef, txAdvisorBeanName));
				parserContext.registerComponent(compositeDef);
			}
		}
	}
这里的执行流程如下:
注册代理组件 –> InfrastructureAdvisorAutoProxyCreator –> 用于创建bean的事务代理类
创建注册事务属性源的bean –> TransactionAttributeSource –> 用于解析注解的事务属性
创建注册事务拦截器的bean –> TransactionInterceptor –> 用于拦截事务注解的方法处理
创建注册事务advisor的bean –> BeanFactoryTransactionAttributeSourceAdvisor –> 用于处理Bean是否需要代理的逻辑
2.2 Bean的事务解析
2.2.1 InfrastructureAdvisorAutoProxyCreator事务代理类
- 1 类图
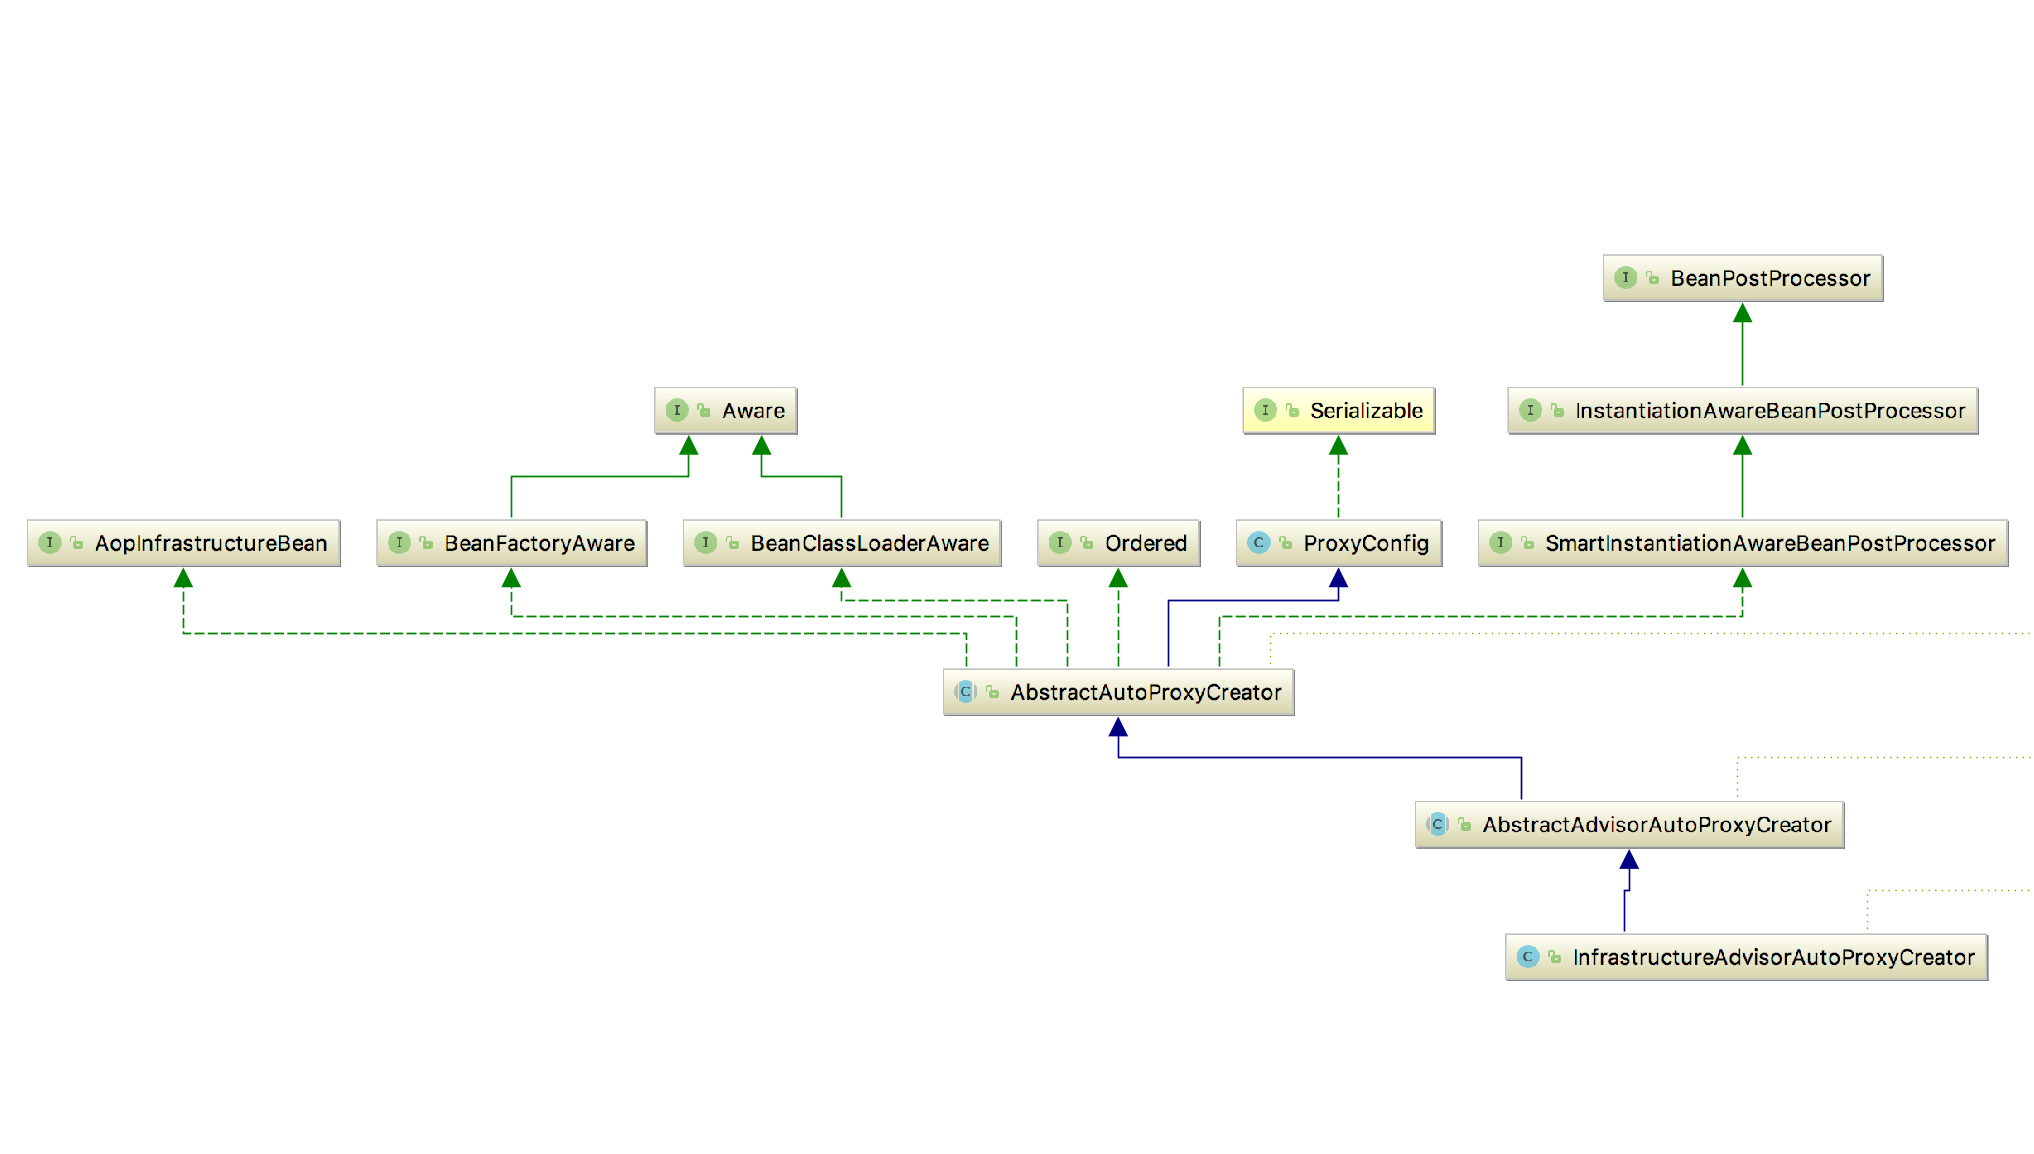
实现了Aware和BeanPostProcessor这两个类,所以在getBean的时候会用到前置处理器和后置处理器
为包含事务注解的Bean类创建代理的入口位于AbstractAutoProxyCreator.postProcessAfterInitialization:
@Override
public Object postProcessAfterInitialization(Object bean, String beanName) throws BeansException {
    if (bean != null) {
    		// 获取缓存key
        Object cacheKey = getCacheKey(bean.getClass(), beanName);
        // 如果不在map中就根据条件决定是否包装bean对象
        if (!this.earlyProxyReferences.contains(cacheKey)) {
            return wrapIfNecessary(bean, beanName, cacheKey);
        }
    }
    return bean;
}
wrapIfNecessary核心逻辑:
	protected Object wrapIfNecessary(Object bean, String beanName, Object cacheKey) {
		if (beanName != null && this.targetSourcedBeans.containsKey(beanName)) {
			return bean;
		}
		if (Boolean.FALSE.equals(this.advisedBeans.get(cacheKey))) {
			return bean;
		}
		// 是否是基础类或者需要跳过的类
		if (isInfrastructureClass(bean.getClass()) || shouldSkip(bean.getClass(), beanName)) {
			this.advisedBeans.put(cacheKey, Boolean.FALSE);
			return bean;
		}

    // 寻找适用于当前bean的Advisor并创建代理
		Object[] specificInterceptors = getAdvicesAndAdvisorsForBean(bean.getClass(), beanName, null);
		if (specificInterceptors != DO_NOT_PROXY) {
			this.advisedBeans.put(cacheKey, Boolean.TRUE);
			// 创建代理
			Object proxy = createProxy(bean.getClass(), beanName, specificInterceptors, new SingletonTargetSource(bean));
			this.proxyTypes.put(cacheKey, proxy.getClass());
			return proxy;
		}

		this.advisedBeans.put(cacheKey, Boolean.FALSE);
		return bean;
	}
当前的bean是否需要创建代理主要就是看getAdvicesAndAdvisorsForBean的方法逻辑
2.2.2 筛选Advisor确定是否需要代理
AbstractAdvisorAutoProxyCreator的筛选符合条件的Advisor方法getAdvicesAndAdvisorsForBean,最终
会调用:
	protected List<Advisor> findEligibleAdvisors(Class beanClass, String beanName) {
	    // 查询Advisor
		List<Advisor> candidateAdvisors = findCandidateAdvisors();
		// 筛选符合条件的Advisor
		List<Advisor> eligibleAdvisors = findAdvisorsThatCanApply(candidateAdvisors, beanClass, beanName);
		extendAdvisors(eligibleAdvisors);
		if (!eligibleAdvisors.isEmpty()) {
		    // 用于对实现了Ordered接口的Advisor进行排序
			eligibleAdvisors = sortAdvisors(eligibleAdvisors);
		}
		return eligibleAdvisors;
	}
上述的流程:
- findCandidateAdvisors –> 寻找实现Advisor接口的所有bean
- findAdvisorsThatCanApply –> 筛选符合条件的Advisor的bean
- extendAdvisors –> 扩展处理
- sortAdvisors –> 排序
重点我们需要知道筛选bean的流程findAdvisorsThatCanApply的方法逻辑中的canApply流程:
public static boolean canApply(Advisor advisor, Class<?> targetClass, boolean hasIntroductions) {
		if (advisor instanceof IntroductionAdvisor) {
		    // 判断advisor是否符合targetClass的切入点操条件
			return ((IntroductionAdvisor) advisor).getClassFilter().matches(targetClass);
		}
		else if (advisor instanceof PointcutAdvisor) {
			PointcutAdvisor pca = (PointcutAdvisor) advisor;
			return canApply(pca.getPointcut(), targetClass, hasIntroductions);
		}
		else {
			// It doesn't have a pointcut so we assume it applies.
			return true;
		}
	}
- 循环处理的判断逻辑:
- 如果
Advisor是IntroductionAdvisor,则判断对应的ClassFilter的matches方法是否匹配当前bean类 - 如果
Advisor是PointcutAdvisor,则先通过ClassFilter进行类匹配,如果匹配不成功,则通过MethodMatcher的matches方法进行方法匹配,只要bean有一个方法满足,则返回true匹配成功
- 如果
Spring事务相关的Advisor已经在之前TxNamespaceHandler.parse中已经注册过该bean。就是
BeanFactoryTransactionAttributeSourceAdvisor 这个类,具体的类图如下:
![]()
该类实现了Advisor接口,同时也是PointcutAdvisor的实现,通过pca.getPointcut()方法获取
Pointcut对象,具体实现是TransactionAttributeSourcePointcut的类
![]()
在调用pc.getClassFilter().matches(targetClass)改方法,根据具体的实现,返回的永远是true,
所以最终进行方法匹配:
	public static boolean canApply(Pointcut pc, Class<?> targetClass, boolean hasIntroductions) {
		Assert.notNull(pc, "Pointcut must not be null");
        //是否Pointcut可以匹配当前类
        if (!pc.getClassFilter().matches(targetClass)) {
			return false;
		}

		MethodMatcher methodMatcher = pc.getMethodMatcher();
		IntroductionAwareMethodMatcher introductionAwareMethodMatcher = null;
		if (methodMatcher instanceof IntroductionAwareMethodMatcher) {
			introductionAwareMethodMatcher = (IntroductionAwareMethodMatcher) methodMatcher;
		}

		Set<Class> classes = new LinkedHashSet<Class>(ClassUtils.getAllInterfacesForClassAsSet(targetClass));
		classes.add(targetClass);
		for (Class<?> clazz : classes) {
			Method[] methods = clazz.getMethods();
			for (Method method : methods) {
			    // 判断给定的方法是否在Pointcut匹配的范围内
				if ((introductionAwareMethodMatcher != null &&
						introductionAwareMethodMatcher.matches(method, targetClass, hasIntroductions)) ||
						methodMatcher.matches(method, targetClass)) {
					return true;
				}
			}
		}

		return false;
	}
上述代码逻辑中,introductionAwareMethodMatcher实例对象为空,所以通过methodMatcher.matches(method, targetClass)来匹配合适的方法,具体的实现逻辑如下:
	public boolean matches(Method method, Class targetClass) {
		// 获取事务属性源
		TransactionAttributeSource tas = getTransactionAttributeSource();
		return (tas == null || tas.getTransactionAttribute(method, targetClass) != null);
	}
最终会调用AnnotationTransactionAttributeSource的computeTransactionAttribute方法来进行匹配:
	private TransactionAttribute computeTransactionAttribute(Method method, Class<?> targetClass) {
		// Don't allow no-public methods as required.
        // 不允许非public访问权限的方法代理
		if (allowPublicMethodsOnly() && !Modifier.isPublic(method.getModifiers())) {
			return null;
		}

		// Ignore CGLIB subclasses - introspect the actual user class.
		Class<?> userClass = ClassUtils.getUserClass(targetClass);
		// The method may be on an interface, but we need attributes from the target class.
		// If the target class is null, the method will be unchanged.
		Method specificMethod = ClassUtils.getMostSpecificMethod(method, userClass);
		// If we are dealing with method with generic parameters, find the original method.
        // 如果我们处理的是一个泛型参数的方法,则获取他的桥方法
		specificMethod = BridgeMethodResolver.findBridgedMethod(specificMethod);

		// First try is the method in the target class.
        // 首先在方法上获取事务的属性
		TransactionAttribute txAtt = findTransactionAttribute(specificMethod);
		if (txAtt != null) {
			return txAtt;
		}

		// Second try is the transaction attribute on the target class.
        // 在类上获取事务的属性
		txAtt = findTransactionAttribute(specificMethod.getDeclaringClass());
		if (txAtt != null) {
			return txAtt;
		}

		if (specificMethod != method) {
			// Fallback is to look at the original method.
			txAtt = findTransactionAttribute(method);
			if (txAtt != null) {
				return txAtt;
			}
			// Last fallback is the class of the original method.
			return findTransactionAttribute(method.getDeclaringClass());
		}
		return null;
	}
上述流程主要通过findTransactionAttribut匹配:
- 1 首先方法上匹配,如果方法上有@Transaction注解则匹配成功,具体会通过SpringTransactionAnnotationParser这个解析器处理
- 2 其实类匹配,如果类上有@Transaction注解则匹配成功
- 3 如果是specificMethod != method,在按上述1和2的流程通过method去匹配
SpringTransactionAnnotationParser的代码如下:
public class SpringTransactionAnnotationParser implements TransactionAnnotationParser, Serializable {

	public TransactionAttribute parseTransactionAnnotation(AnnotatedElement ae) {
		Transactional ann = AnnotationUtils.getAnnotation(ae, Transactional.class);
		if (ann != null) {
			return parseTransactionAnnotation(ann);
		}
		else {
			return null;
		}
	}

	public TransactionAttribute parseTransactionAnnotation(Transactional ann) {
		RuleBasedTransactionAttribute rbta = new RuleBasedTransactionAttribute();
		rbta.setPropagationBehavior(ann.propagation().value());
		rbta.setIsolationLevel(ann.isolation().value());
		rbta.setTimeout(ann.timeout());
		rbta.setReadOnly(ann.readOnly());
		rbta.setQualifier(ann.value());
		ArrayList<RollbackRuleAttribute> rollBackRules = new ArrayList<RollbackRuleAttribute>();
		Class[] rbf = ann.rollbackFor();
        // 回滚规则
        for (Class rbRule : rbf) {
			RollbackRuleAttribute rule = new RollbackRuleAttribute(rbRule);
			rollBackRules.add(rule);
		}
		String[] rbfc = ann.rollbackForClassName();
		for (String rbRule : rbfc) {
			RollbackRuleAttribute rule = new RollbackRuleAttribute(rbRule);
			rollBackRules.add(rule);
		}
		// 不需要回滚异常的规则
		Class[] nrbf = ann.noRollbackFor();
		for (Class rbRule : nrbf) {
			NoRollbackRuleAttribute rule = new NoRollbackRuleAttribute(rbRule);
			rollBackRules.add(rule);
		}
		String[] nrbfc = ann.noRollbackForClassName();
		for (String rbRule : nrbfc) {
			NoRollbackRuleAttribute rule = new NoRollbackRuleAttribute(rbRule);
			rollBackRules.add(rule);
		}
		rbta.getRollbackRules().addAll(rollBackRules);
		return rbta;
	}
}
就此,我们就可以判定Bean的方法中是否包含@Transaction这个注解,如果包含这返回这个对应Advisor,
即BeanFactoryTransactionAttributeSourceAdvisor这个实现,如果有这个实现那么
  // 寻找适用于当前bean的Advisor并创建代理
		Object[] specificInterceptors = getAdvicesAndAdvisorsForBean(bean.getClass(), beanName, null);
		if (specificInterceptors != DO_NOT_PROXY) {
			this.advisedBeans.put(cacheKey, Boolean.TRUE);
			// 创建代理
			Object proxy = createProxy(bean.getClass(), beanName, specificInterceptors, new SingletonTargetSource(bean));
			this.proxyTypes.put(cacheKey, proxy.getClass());
			return proxy;
		}
就会创建bean的代理类
2.2.3 创建事务代理类
	protected Object createProxy(
			Class<?> beanClass, String beanName, Object[] specificInterceptors, TargetSource targetSource) {
	    // 创建代理工厂
		ProxyFactory proxyFactory = new ProxyFactory();
		// Copy our properties (proxyTargetClass etc) inherited from ProxyConfig.
		// 拷贝当前类中的相关属性
		proxyFactory.copyFrom(this);
        //判定给定的bean是否代理Class
		if (!shouldProxyTargetClass(beanClass, beanName)) {
			// Must allow for introductions; can't just set interfaces to
			// the target's interfaces only.
			Class<?>[] targetInterfaces = ClassUtils.getAllInterfacesForClass(beanClass, this.proxyClassLoader);
			for (Class<?> targetInterface : targetInterfaces) {
				proxyFactory.addInterface(targetInterface);
			}
		}

        //将interceptor适配为Advisor
        Advisor[] advisors = buildAdvisors(beanName, specificInterceptors);
		for (Advisor advisor : advisors) {
			proxyFactory.addAdvisor(advisor);
		}
        // 设置目标类
		proxyFactory.setTargetSource(targetSource);
		customizeProxyFactory(proxyFactory);
        // 设置是否冻结,默认为false即代理设置后不允许修改代理的配置
		proxyFactory.setFrozen(this.freezeProxy);
		if (advisorsPreFiltered()) {
			proxyFactory.setPreFiltered(true);
		}
		// 创建代理
		return proxyFactory.getProxy(this.proxyClassLoader);
	}
创建代理的主要目的就是将 Advisor[] advisors = buildAdvisors(beanName, specificInterceptors)的advisor集合放入到生成代理类的的AdvisedSupport advised变量中,在执行的时候会解析成Interceptor,然后调用,这边不具体展开。
[评论][COMMENTS]